
Deutsch
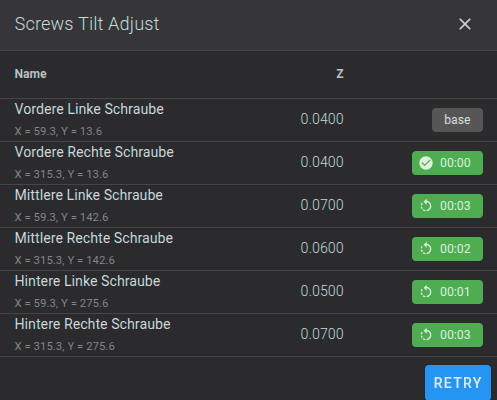
Getestet auf einem Neptune 4 Plus mit USB-C-Toolhead (Direct-Drive-Variante).
Das Tool fährt den Druckkopf automatisch zu jeder der 6 Schrauben-Positionen und misst dort per Sensor die Bett-Höhe – man muss also nichts manuell anfahren oder mit einem Blatt Papier testen.
Nach dem Ausführen von SCREWS_TILT_CALCULATE zeigt die Konsole für jede Schraube eine Zeile wie diese:
mittlere linke Schraube : x=59.3, y=142.6, z=0.07000 : adjust CCW 00:03So liest du das:
1. Blickrichtung
Immer von oben auf den Schraubenknopf schauen – so, wie man auf eine liegende Uhr blickt. Das gilt für jede der 6 Schrauben gleich, egal ob sie vorne, in der Mitte oder hinten sitzt.
2. Richtung: rechts oder links
| Ausgabe | Bedeutung |
|---|---|
| CW | nach rechts drehen (im Uhrzeigersinn) |
| CCW | nach links drehen (gegen den Uhrzeigersinn) |
3. Wie weit drehen?
Die Zeitangabe funktioniert wie eine Uhr: 60 Minuten = eine volle Umdrehung (360°).
| Beispiel | Bedeutung |
|---|---|
00:03 | nur 3 Minuten weiterdrehen (kleine Korrektur, ca. 18°) |
00:15 | eine Vierteldrehung (90°) |
01:20 | 1 volle Umdrehung plus 20 Minuten (insgesamt 1⅓ Umdrehungen) |
4. Die Referenz-Schraube („base“)
Die erste Schraube in der Liste ist die Referenz (z. B. „vordere linke Schraube (base)“). Diese wird nie selbst gedreht – alle anderen Werte und Richtungen sind relativ zu ihr berechnet.
5. Ablauf
SCREWS_TILT_CALCULATEausführen und Ausgabe ablesen.- Jede Schraube (außer der Referenz) wie oben beschrieben um die angegebene Zeit nach rechts oder links drehen.
- Befehl erneut ausführen und prüfen, ob die Korrekturen kleiner geworden sind.
- Wiederholen, bis nur noch sehr kleine Korrekturen (wenige Minuten) übrig bleiben – exakt 0 ist nicht nötig, kleine Restabweichungen gleicht das Bed Mesh ohnehin aus.
Draufsicht aufs Bett (zur Orientierung)
                 Hinten
  [Hintere Links]          [Hintere Rechts]

  [Mittlere Links]         [Mittlere Rechts]

  [Vordere Links] (base)   [Vordere Rechts]
                 Vorne (Nutzer-Seite)
Konfiguration zum Einfügen
Wichtig: Erstelle vor dem Einfügen unbedingt ein Backup deiner aktuellen printer.cfg (z. B. per Kopie oder Download über Fluidd/Mainsail), damit du im Fall eines Fehlers jederzeit zur ursprünglichen Version zurückkehren kannst.
Dieser Block gehört zwischen [bed_mesh] und [output_pin caselight1] in die printer.cfg:
#####################################################################
# Elegoo Neptune 4 Plus - Screws Tilt Adjust
#
# Tested on a Neptune 4 Plus with the USB-C toolhead (direct-drive variant).
#
# Created date: 2026-10-02
#
# Add between [bed_mesh] and [output_pin caselight1] in printer.cfg
#
# Disclaimer: provided "as is", without warranty. Created and tested
# privately, no guarantee of completeness or correctness. Use at your
# own responsibility and risk - no liability for any resulting damage.
#
#####################################################################

[screws_tilt_adjust]
screw1: 59.3, 13.6
screw1_name: front left screw
screw2: 315.3, 13.6
screw2_name: front right screw
screw3: 59.3, 142.6
screw3_name: middle left screw
screw4: 315.3, 142.6
screw4_name: middle right screw
screw5: 59.3, 275.6
screw5_name: rear left screw
screw6: 315.3, 275.6
screw6_name: rear right screw
horizontal_move_z: 10
speed: 120
screw_thread: CW-M4

[gcode_macro SCREWS_TILT_CALCULATE]
rename_existing: BASE_SCREWS_TILT_CALCULATE
description: Check bed screw tilt via the probe; homes automatically first, so no manual G28 is needed beforehand.
gcode:
    G28
BASE_SCREWS_TILT_CALCULATEHaftungsausschluss: Diese Anleitung und das zugehörige Macro werden „wie es ist“ (as is), ohne jegliche Garantie, bereitgestellt. Sie wurden privat erstellt und getestet, erheben aber keinen Anspruch auf Vollständigkeit oder Fehlerfreiheit. Die Nutzung erfolgt auf eigene Verantwortung und eigenes Risiko. Für Schäden an Drucker, Bauteilen oder sonstiges, die durch die Anwendung dieser Anleitung oder Konfiguration entstehen, wird keine Haftung übernommen.
English
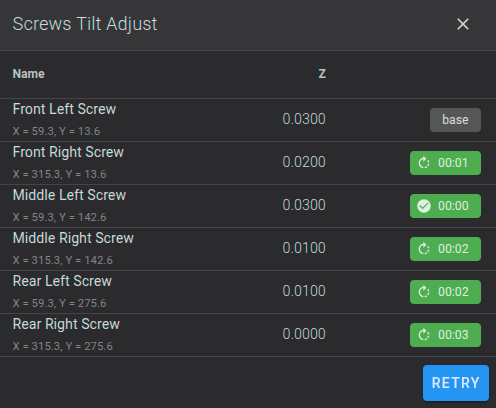
Tested on a Neptune 4 Plus with the USB-C toolhead (direct-drive variant).
The tool automatically moves the toolhead to each of the 6 screw positions and measures the bed height there with the probe/sensor – no manual positioning or paper test needed.
After running SCREWS_TILT_CALCULATE, the console prints a line like this for every screw:
middle left screw : x=59.3, y=142.6, z=0.07000 : adjust CCW 00:03Here’s how to read it:
1. Viewing direction
Always look straight down at the screw knob from above – the same way you’d look down at a clock lying flat on a table. This applies the same way to all 6 screws, whether at the front, middle, or back.
2. Direction: right or left
| Output | Meaning |
|---|---|
| CW | turn right (clockwise) |
| CCW | turn left (counter-clockwise) |
3. How far to turn?
The time value works like a clock: 60 minutes = one full turn (360°).
| Example | Meaning |
|---|---|
00:03 | turn just 3 minutes further (a small correction, about 18°) |
00:15 | a quarter turn (90°) |
01:20 | 1 full turn plus 20 minutes (1⅓ turns total) |
4. The reference screw („base“)
The first screw listed is the reference (e.g. „front left screw (base)“). This one is never turned itself – every other value and direction is calculated relative to it.
5. Procedure
- Run
SCREWS_TILT_CALCULATEand read the output. - Turn every screw except the reference, right or left, by the amount shown, as described above.
- Run the command again and check whether the corrections have gotten smaller.
- Repeat until only very small corrections (a few minutes) remain – getting exactly to 0 isn’t necessary, the bed mesh will smooth out any tiny remaining differences anyway.
Top-down view of the bed (for orientation)
Back
[Rear Left] [Rear Right]
[Middle Left] [Middle Right]
[Front Left] (base) [Front Right]
Front (user side)Configuration to add
Important: Before adding this, make a backup of your current printer.cfg (e.g. by copying it or downloading it via Fluidd/Mainsail), so you can always revert to the original version if something goes wrong.
This block goes between [bed_mesh] and [output_pin caselight1] in printer.cfg:
#####################################################################
# Elegoo Neptune 4 Plus - Screws Tilt Adjust
#
# Tested on a Neptune 4 Plus with the USB-C toolhead (direct-drive variant).
#
# Created date: 2026-10-02
#
# Add between [bed_mesh] and [output_pin caselight1] in printer.cfg
#
# Disclaimer: provided "as is", without warranty. Created and tested
# privately, no guarantee of completeness or correctness. Use at your
# own responsibility and risk - no liability for any resulting damage.
#
#####################################################################

[screws_tilt_adjust]
screw1: 59.3, 13.6
screw1_name: front left screw
screw2: 315.3, 13.6
screw2_name: front right screw
screw3: 59.3, 142.6
screw3_name: middle left screw
screw4: 315.3, 142.6
screw4_name: middle right screw
screw5: 59.3, 275.6
screw5_name: rear left screw
screw6: 315.3, 275.6
screw6_name: rear right screw
horizontal_move_z: 10
speed: 120
screw_thread: CW-M4

[gcode_macro SCREWS_TILT_CALCULATE]
rename_existing: BASE_SCREWS_TILT_CALCULATE
description: Check bed screw tilt via the probe; homes automatically first, so no manual G28 is needed beforehand.
gcode:
    G28
BASE_SCREWS_TILT_CALCULATEDisclaimer: This guide and the accompanying macro are provided „as is“, without any warranty. They were created and tested privately, and come with no guarantee of completeness or correctness. Use them at your own responsibility and risk. No liability is accepted for any damage to the printer, components, or anything else resulting from following this guide or using this configuration.